JOEHEWITT.COM
Sunday July 10
Workflows Part 2: Pasting Images
I like adding images to illustrate my blog posts, but doing so is a royal pain. I rarely have the time or patience to go through all of these steps:
- Screen capture or download an image
- Find the image file on my hard drive
- Open it in Photoshop
- Scale the image and save it as a thumbnail copy
- Rename the file and thumbnail to something consistent
- Open FTP client
- Scratch my head and try to remember which folder on my website I usually put images in
- Drag the file to that folder to upload it
- Wait for image to upload and then double-check in browser to make sure it looks ok
- Type out the html to insert the thumbnail and a link to the full-size image
- Think to self, for the millionth time, "Self, you should automate this tedium!"
In the past I've thought about automating a few of these steps, like maybe a script to just create the thumbnail, or to upload images to my site. But that isn't good enough. I wanted to reduce the whole thing to just two steps:
- Copy the desired image to clipboard
- Press a keyboard shortcut to "paste" a link to the image/thumbnail into my editor
Using Python, PyObjC, AppleScript, and my desktop web server, I was able to accomplish this. Here's how it works:
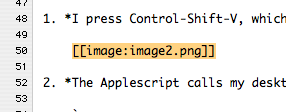
- I press Control-Shift-Command-V, which calls a Quicksilver trigger that runs an Applescript:
- The Applescript calls my desktop web service via XMLRPC:
- A Python function on the web server is called to do all the pasting magic:
- Applescript gets the markup back from XMLRPC and inserts it into the text file that I am editing:
- Later, I publish the post to my blog:
![]()
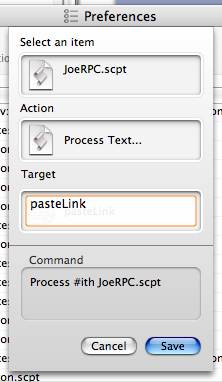
The Quicksilver "Process Text" action passes the string "pasteLink" to the Handle function in JoeRPC.scpt, which decides which function to call:
to Handle(expression)
    if expression = "pasteLink" then
        PasteLink()
    end if
end Handle

to PasteLink()
    tell application "http://user:password@localhost/call:"
        set linkMarkup to
            call xmlrpc {method name:"pasteLink", parameters:{}}
    end tell
end PasteLink
def pasteLink(request):
    acquireClipboardImage()
    ...
Using PyObjC we can grab the image that is on the clipboard as an NSImage object, which has lots of image processing potential:
def acquireClipboardImage():
    pasteboard = NSPasteboard.generalPasteboard()
    return NSImage.alloc().initWithPasteboard_(pasteboard)
Then we scale the image down to thumbnail size:
def scaleImage(image, width=None, height=None):
    originalSize = image.size()

    if width and not height:
        height = width / (originalSize[0]/originalSize[1])
    elif height and not width:
        width = (image.size()[0]/image.size()[1]) / height

    destRect = ((0, 0), (width, height))
    srcRect = ((0, 0), (originalSize[0], originalSize[1]))

    newImage = NSImage.alloc().initWithSize_((width, height))

    newImage.lockFocus()

    context = NSGraphicsContext.currentContext()
    context.setImageInterpolation_(AppKit.NSImageInterpolationHigh)

    image.drawInRect_fromRect_operation_fraction_(destRect, srcRect,
        AppKit.NSCompositeSourceOver, 1.0)

    newImage.unlockFocus()

    return newImage
Then we create a unique numbered file name for image, like image2.png, within my blog images folder, and save each image there:
def saveImage(image, path):
    tiffData = image.TIFFRepresentation()
    bitmap = NSBitmapImageRep.alloc().initWithData_(tiffData)

    fileType = AppKit.NSPNGFileType
    imageData = bitmap.representationUsingType_properties_(fileType, nil)
    imageData.writeToFile_atomically_(path, YES)
Finally, we create the plain text markup for a link to the newly created image, and return it back to Applescript through XMLRPC:
def pasteLink(request):
    ...
    return "[[image:%s]]" % os.path.basename(imagePath)`
set imageMarkup to call xmlrpc {method name:"pasteLink", parameters:{}}

tell application "BBEdit"
    set selection of text window 1 to imageMarkup
end tell
And voila, the link appears in my editor:
I have another Python script that looks for linked images in my post, and uploads them to my server. It then renders my post to HTML, translating [[image:image2.png]] into:
<a href="/blog/images/image2.png"><img src="/blog/images/image2-sm.png"/></a>
Including images in my blog is now so easy, I have no excuse not to do it. The screen captures you see in this post were of course created using this very automation.
Finally, my thanks go out to the people whose blogs helped me figure out how to use PyObjC to do all this, namely Bob Ippolito and Buzz Anderson.
NOTE: I used to use the appscript Python bridge to Applescript, but found it to be a little bit memory hungry. It added about 20-30MB to the footprint of my web server. Calling AppleScript directly has proved to be the best solution for now.
